Tuesday, October 30, 2007

Vaginal Massacre and Dream Design

I know, the title is stupid, but the first part is the name of a dentro and the second part is the name of a guy who called himself that. I am sure that the name for the dentro was chosen to get the attention of people. I guess it worked, because this Amiga Dentro won the demo competition at Scoopex's CeBit'1993 demoparty held in Hannover/Germany in... right, 1993.

I am sure that many of you also just checked this post only out because of the title of it. The funny thing is that it does not use any offending slang words at all. Did you notice that? "Vaginal" is a perfectly fine term used in human biology and "Massacre" is also not slang. It's not a nice word, but so is "murder" or "war".

Just FYI for the non-geeks who are not familar with the demoscene. A dentro is the short version for "disk intro" and is basically something in between a full "demo" and a basic "intro" in computer scene terms. A dentro is more than just an intro, but less than a full blown demo. What a "demo" and "intro" is, you have to find out for yourself :)

Here is the video of the dentro "Vaginal Massacre".


Alternatives: Link to the video at YouTube.com and Link to the video at Facebook.com this one has a better quality and higher resolution, but requires a Facebook account to view it. You don't have to be a friend of mine via FB to see it.

Now that wasn't too bad, right?

Okay, here are some backgrounds to this dentro.

The prize for the winner of the demo competition was a brand new Commodore Amiga 600 that just came out that year. The winning of the dentro was a surprise, considering the fact that the "Elite" boys from Masque/TRSi showed up and presented their "Misery Dentro Part II" (links to the video at YouTube), which boasted a lot more effects than this dentro. I guess the marketing plot worked for this dentro, because it beat the technically superior dentro to the punch.

U.D.O. is an abbreviation for "Unsere Doofen Ossis" (roughly translated "Our Stupid East Germans"). It's a fake group that did not exist. The people who did this were actually the members of the East German Amiga group called Remedy. How do I know this? I happen to know the guys personally :).

This was actually the place and time when and where I met one of the (then) future SAC (Superior Art Creations) founding members, the pixel graphics artist Dream Design. He did most of the graphics for the dentro, specifically the most memorable splash page, which is shown below.



He also pixeled this picture using less than 32 colors. Its around 16 colors only. Amazing, isn't it?

Anyhow, I did not know him, but saw him having this image loaded, staring at it and checking stuff with the lens feature of Deluxe Paint.

I said to him: "nice photograph". He turned around with a red face, looked at me and yelled: "I was drawing this and I worked over 3 full days on it!!!".

Ooops.. Well, somebody else might have taken my comment as a compliment hehe. The picture uses only 32 colors, remarkable.

I was looking for a video version of this dentro for a while and could not find it anywhere, maybe because of its name, who knows.

I have to thank "pgtyunbderf", a user at YouTube.com, for capturing the dentro for me. I only had to edit it and also replaced the sound with the original MOD music for better quality.

I thought that this is an interesting story and an interesting video (and picture) as well. Enjoy!

Cheers!

Carsten aka Roy/SAC

Friday, October 26, 2007

SACtros - The Intros for SAC Art Packs

It took me a while, but finally are (almost) all SACtros available in video format on the site.

What are SACtros?
SACtros are the intros that were created specifically for SAC art pack releases only. In contradiction to cracktros or BBStros were SACtros only used for one release, the individual SAC pack it was created for.

SAC intros VideosFeatures and Interface
You can watch the videos directly on my website via embedded Flash video player. I also provided a link to the video at YouTube, just in case the player on the site is not working for somebody for unknown reasons. You are also able to download the video for each SACtro in .AVI format to your hard disk.

Goodies for Old School Geeks
For the old school folks are links to the original MS DOS executable and to the original MOD file (sound tracker music) available.

The Bad News
That were the good news, now to the bad ones. There is no video for SACtro #2. The reason for this is not that I forgot or neglected it, but the fact that I was unable to get it to work on a modern Windows PC to capture the video.

DOSBox


I used DOSBOX x86 Emu for old PC emulation and unpacked and unprotected the DOS executable. I also found out that there was a bug in Borland Pascal that causes programs written in old BP (this intro was, BP and in-line Assembler) to crash on modern day CPUs. I fixed the executable so that this bug is not a problem anymore, but it still does not work.

SAC intros VideosAsking for Help
If you are a geek and know some more options or alternatives for getting this intro to run in a DOS Window for video capturing, let me know.

If you can produce a video capture and send it to me, even better. Here is the executable (zipped) in the current stage (unpacked/unprotected/BP fix applied). Just in case, here is the original one, which used to work fine on old machines (just in case I messed something up during my fixing attempts).

Don't worry about the sound. I would mix that in afterwards manually anyway, just for sound quality reasons. Also if the intro runs very very slow, no problem. I had that with several of the other videos too. I did a lot of editing to get them to look like on good old MS DOS machines.

Thanks in advance and enjoy the other SACtros that I were able to record and edit at my website. I also hope that you like the interactive AJAX interface for the SACtro selection.

Cheers!
Carsten aka Roy/SAC

Sunday, October 21, 2007

Perspective Projection on the Computer

Perspective projection is a means of representing something that is three-dimensional in a two-dimensional space, or in other words the representation of 3D in 2D, something we are all familiar with from the computer of course and also TV, photographs, paintings and drawings.

A basic rule of perspective projection is that something that is further away from the viewer at a three-dimensional space is “smaller” in the two-dimensional representation and “larger” if it is closer.

This holds true even for seemingly two-dimensional objects in the 3D world, like a flat painting from the front. Now everything in the real world is three-dimensional, but some things do not appear that way, or at least not much, to the human eye. If one dimension is too small, an object will appear two-dimensional to us.

Axonometric Projection
If the object is really “thick” or “deep” or we know from experience that the object is that way, a representation of the object in 2D is enhanced if not only one side (or two dimensions) are shown, the width and the height, but also the part of the side that we determine as the “depth”. Axonometric projection is the term used in geometry to describe the representation of an object with two or more “sides” visible to get a feeling of its width, height and depth.

There are three main sub forms of axonometric projection, which are isometric, dimetric and trimetric projection. The difference between the three is the angle and perspective of the viewer to the object.

In isometric projection for example, the angles between the projection of the x, y, and z-axes are the same or 120-degrese.
In dimetric-projection, only two of the three axes in space must be foreshortened equally, while the angle and scale of the third axis can vary.

If all three axes appear to be foreshortened differently, we talk about trimetric projection.

click to enlargeShort summary
Isometric = angles for x, y, z are the same, dimetric = only two are the same, trimetric = none is the same. See the illustration that shows an example for each type of projection.

Each of those types of projections were a pain and difficult to master for early computer generations, because the math behind them is very complex.

The Cheat: Oblique-Projection
Early computer generations used often oblique-projection for simple 3D effects, because it was relatively easy to do.

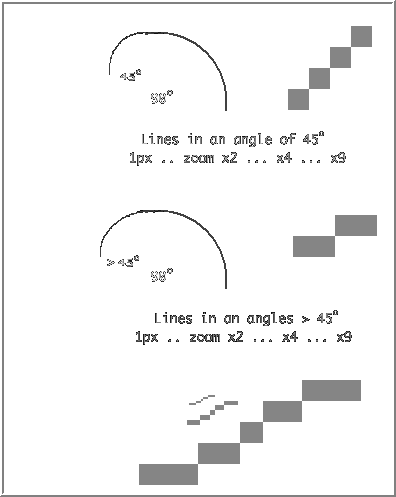
One way to draw using oblique-projection is to draw the side of the object you are looking at in two dimensions, i.e. flat. Then draw the other side’s at an angle of 45 degrees, but instead of drawing the sides full size, you only draw them with half the depth. This 45-degree angle was easy to manage.

Think about a computer screen as something like a checkerboard and draw an imaginable square on it. To draw the third dimension lines, you simply start at a corner, go one square to the side and then one square up or down, depending on the angle. You repeat this until you marked the number of squares that represent half of the actual length of that side. Drawing a proper line if the angle is different from 45-degrees becomes difficult. See the illustration that shows lines at different angles on a computer (click on the image to enlarge it).


The beauty with the simple 45-degrees oblique projection was that you do not have to do any vector calculations. Vector calculations take up CPU time (a lot, because of the needed divisions and work with floating points, something older computers were unable to deal with), nor did you require sophisticated line drawing algorithms like the famous Bresenham algorithm.

The Commodore 64 for example did not have a floating-point unit. The C-64 CPU was not able to do any kind of floating point operations, which was the reason why real-time 3D-animation did not exist on this machine (until much later, when smart coders used tricks to work around that problem to create visual effects that look like 3D vector graphics.

Seeing Pixels? Missed the Anti Aliasing, eh?
Even if you got the stuff calculated and the basic lines drawn was there still a problem. If you draw a line that is not 45deg on a computer screen pixel will become visible badly (the Bresenham article shows it nicely). In order to compensate for this side effect had to be used another, even more complicated method be used, which is generally known as anti-aliasing.

Anti aliasing is a trick for the human-eye, which makes sharp edges appear blurry and if done very well even soft. If this is combined with motion (what is even harder to do), the human eye will not notice this blurriness anymore and the edges will appear clean and sharp as they did when it was a simple 45deg angle.

It is more challenging if the angle is anything else but 45-degrees, for the programmer who tries to get a 3D-object on the 2D screen and also for the artist who tries to do the same thing with a single picture.

Thanks God for FPU and Photoshop
Computers became more powerful and most home computers today have 3D acceleration build into their graphics card in addition to one or more powerful CPU with special floating-point calculation unit. The artists got help too. Modern graphical applications provide build-in features for anti-aliasing. This was done by hand in the past.

Anti-Aliasing by Hand
Have a look at the famous “Fairlight” logo pixeled by Angel Dawn on the Commodore Amiga in a resolution of 320x256 and only 32 colors. There were no build-in features for anti-aliasing back then. The artist had to do it himself by setting additional pixels with the right color next to the pixels of the actual line. I enlarged one corner of the logo that you can see how he did it. Remarkable, isn’t it?

For additional and even more remarkable example of hand done anti-aliasing and pixeling, check out my post about the art by Dream Design from last summer. Yes, believe it or not, all of the images were hand pixeled. No Photoshop was used and no, those are not digital or scanned photographs either.


Cheers!
Carsten aka Roy/SAC